 In two node master-master setup, MMM uses five IPs: single permanent IP for each node that is never changed, 2 reader IPs (read-only) and 1 writer IP (updates). Last three IPs are migrating between the nodes depending on node availability.
| [Top] | [Contents] | [Index] | [ ? ] |
This manual is for MMM version 2.
| 1. Overview | ||
| 2. Typical use-cases | ||
| 3. Requirements | ||
4. mmm_agentd - the agent | ||
5. mmm_mond - the monitor | ||
6. mmm_control - controlling the monitor | ||
| 7. Configuration | ||
| 8. Logging | ||
| Index |
| [ < ] | [ > ] | [ << ] | [ Up ] | [ >> ] | |
| [Top] | [Contents] | [Index] | [ ? ] |
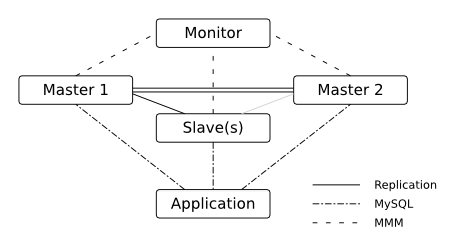
MMM (Master-Master Replication Manager for MySQL) is a set of flexible scripts to perform monitoring/failover and management of MySQL Master-Master replication configurations (with only one node writable at any time). The toolset also has the ability to read balance standard master/slave configurations with any number of slaves, so you can use it to move virtual IP addresses around a group of servers depending on whether they are behind in replication. In addition to that, it also has scripts for data backups, resynchronization between nodes etc.
The main functionality is provided through the following three scripts:
mmm_mondmonitoring daemon which does all monitoring work and makes all decisions about roles moving and so on.
mmm_agentdagent daemon which runs on each MySQL server and provides monitoring node with simple set of remote services.
mmm_controlsimple script dedicated to management of the mmm_mond processes by commands.
| [ < ] | [ > ] | [ << ] | [ Up ] | [ >> ] | |
| [Top] | [Contents] | [Index] | [ ? ] |
Typical use cases of MMM will be described in the following two sections.
| [ < ] | [ > ] | [ << ] | [ Up ] | [ >> ] | |
| [Top] | [Contents] | [Index] | [ ? ] |
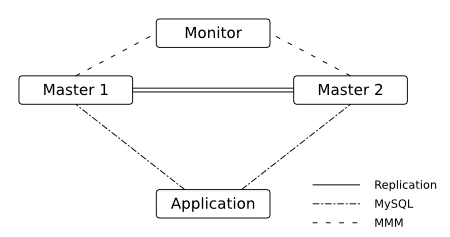
In two node master-master setup, MMM uses five IPs: single permanent IP for each node that is never changed, 2 reader IPs (read-only) and 1 writer IP (updates). Last three IPs are migrating between the nodes depending on node availability.
Normally (no replication failures, no replication delay etc) active master has 2 IPs (reader and writer), standby master - 1 IP (reader). In case of a failure, both - writer and reader roles migrate to the working node.
| [ < ] | [ > ] | [ << ] | [ Up ] | [ >> ] | |
| [Top] | [Contents] | [Index] | [ ? ] |
| [ < ] | [ > ] | [ << ] | [ Up ] | [ >> ] | |
| [Top] | [Contents] | [Index] | [ ? ] |
For an MMM setup with n MySQL servers, you'll need
n + 1 hostsOne host for each MySQL server; one host for the MMM monitor.
2 * (n + 1) IPsOne IP for each host (see above); one IP for the writer role; n IPs for one reader role per host.
monitor userA MySQL user with privileges REPLICATION CLIENT for MMM monitor.
agent userA MySQL user with privileges SUPER, REPLICATION CLIENT, PROCESS for MMM agent.
replication userA MySQL user with privileges REPLICATION SLAVE used for replication.
tools userA MySQL user with privileges SUPER, REPLICATION CLIENT, RELOAD for MMM tools.
| [ < ] | [ > ] | [ << ] | [ Up ] | [ >> ] | |
| [Top] | [Contents] | [Index] | [ ? ] |
mmm_mond as non-root user)
| [ < ] | [ > ] | [ << ] | [ Up ] | [ >> ] | |
| [Top] | [Contents] | [Index] | [ ? ] |
One should set read-only=1 in the configuration of all MySQL servers, MMM will change that to read-only=0 on the host with the active_master_role.
| [ < ] | [ > ] | [ << ] | [ Up ] | [ >> ] | |
| [Top] | [Contents] | [Index] | [ ? ] |
If you want to use the MMM tools (mmm_backup, mmm_restore, mmm_clone) you have to use LVM for the partition on which your MySQL databases and logs reside. Note: You'll need free physical extends for the snapshots undo space (see Estimating Undo Space needed for LVM Snapshot).
You'll also need the following perl modules:
| [ < ] | [ > ] | [ << ] | [ Up ] | [ >> ] | |
| [Top] | [Contents] | [Index] | [ ? ] |
mmm_agentd - the agent TODO short description
| [ < ] | [ > ] | [ << ] | [ Up ] | [ >> ] | |
| [Top] | [Contents] | [Index] | [ ? ] |
mmm_mond - the monitor | 5.1 States | ||
| 5.2 Roles | ||
| 5.3 Status file | ||
| 5.4 Checks | ||
| 5.5 Network check | ||
| 5.6 Flapping | ||
| 5.7 Modes | ||
| 5.8 Startup | ||
| 5.9 Role transition | ||
| 5.10 Kill host functionality |
| [ < ] | [ > ] | [ << ] | [ Up ] | [ >> ] | |
| [Top] | [Contents] | [Index] | [ ? ] |
| Host is running without any problems. |
| host was set to offline manually. |
| Host is offline (Check |
| Host is awaiting recovery |
| replication backlog is too big (Check |
| replication threads are not running (Check |
ONLINE may have roles. When a host switches
from ONLINE to any other state, all roles will be removed from it.
REPLICATION_DELAY or
REPLICATION_FAIL will be switched back to ONLINE if everything
is OK again, unless it is flapping (see Flapping).
HARD_OFFLINE will be switched to
AWAITING_RECOVERY if everything is OK again. If its downtime was shorter
than 60 seconds and it wasn't rebooted or auto_set_online is > 0 it will be switched back to ONLINE
automatically, unless it is flapping (see Flapping again).
REPLICATION_DELAY or REPLICATION_FAIL.
ONLINE less than 60 seconds ago (That's the default value of
master-connect-retry).
rep_backlog and rep_threads fail, the state will change to REPLICATION_FAIL.
| [ < ] | [ > ] | [ << ] | [ Up ] | [ >> ] | |
| [Top] | [Contents] | [Index] | [ ? ] |
There are two types of roles:
exclusive rolesExclusive roles may only have one ip and are assigned to one host at a time. You may specify a preferred host, to which the role will always be moved, if it's online. Note: You can't move roles which are assigned to the preferred host, because they would be moved back to it immediately.
balanced rolesBalanced roles may have multiple ips. The ips will be balanced between the hosts, so that no host has two roles more than another host.
TODO describe active_master_role allow writes change master of all hosts with mode=slave to this host
| [ < ] | [ > ] | [ << ] | [ Up ] | [ >> ] | |
| [Top] | [Contents] | [Index] | [ ? ] |
information about host state and roles ‘status_path’
| [ < ] | [ > ] | [ << ] | [ Up ] | [ >> ] | |
| [Top] | [Contents] | [Index] | [ ? ] |
mmm_mond performs four different checks on each host to determine if it is OK. These checks are:
ping | host is pingable |
mysql | MySQL server on the host is alive |
rep_threads | replication threads are running |
rep_backlog | replication backlog is not too big |
| [ < ] | [ > ] | [ << ] | [ Up ] | [ >> ] | |
| [Top] | [Contents] | [Index] | [ ? ] |
mmm_mond has the ability to detect a non-functioning network connection. It regularly pings all ping_ips defined in the config. If at least one ip is reachable, the network is considered to be working.
Without working network connection mmm_mond will...
If the network connection doesn't work during startup, mmm_mond will delay startup until it's available again.
| [ < ] | [ > ] | [ << ] | [ Up ] | [ >> ] | |
| [Top] | [Contents] | [Index] | [ ? ] |
mmm_mond supports the detection of hosts that are "flapping". Flapping occurs
if a host which is ONLINE changes its state to HARD_OFFLINE / REPLICATION_FAIL
/ REPLICATION_DELAY too often and each time gets switched back to ONLINE
(because of auto_set_online or because it has been down for less than 60 seconds). This may lead to roles
getting switched between hosts very often.
To prevent this mmm_mond has a built in flap-detection which can be tuned in
the configuration file. If a host goes down for more than flap_count
times within flap_duration seconds it is considered as
flapping and will not be set ONLINE automatically. It will stay in state
AWAITING_RECOVERY until it gets set online (with mmm_control set_online host).
If auto_set_online is > 0, flapping hosts will automatically be set to ONLINE
after flap_duration seconds.
| [ < ] | [ > ] | [ << ] | [ Up ] | [ >> ] | |
| [Top] | [Contents] | [Index] | [ ? ] |
| [ < ] | [ > ] | [ << ] | [ Up ] | |
| [Top] | [Contents] | [Index] | [ ? ] |
The monitor will remove roles from failed hosts and assign them to other hosts automatically.
| [ < ] | [ > ] | [ << ] | [ Up ] | [ >> ] | |
| [Top] | [Contents] | [Index] | [ ? ] |
The monitor will only distribute balanced roles across the hosts, but will not remove roles from failed hosts automatically. You can remove roles from failed hosts manually with move_role.
| [ < ] | [ > ] | [ << ] | [ Up ] | [ >> ] | |
| [Top] | [Contents] | [Index] | [ ? ] |
Like MANUAL mode, but mode will be changed into ACTIVE mode when both master hosts are ONLINE or after wait_for_other_master seconds have elapsed.
| [ < ] | [ > ] | [ << ] | [ Up ] | [ >> ] | |
| [Top] | [Contents] | [Index] | [ ? ] |
In passive mode the monitor doesn't change roles, update the status file nor send anything to agents.
In passive mode you can modify roles (unclean) with set_ip - the changes won't be applied until the monitor is switched to ACTIVE or MANUAL mode with set_active or set_manual.
Passive mode will be entered if conflicting roles are detected during startup. You should then analyze the situation, fix the role information (if needed) and switch into ACTIVE or MANUAL mode.
It also can be entered manually with set_passive.
| [ < ] | [ > ] | [ << ] | [ Up ] | [ >> ] | |
| [Top] | [Contents] | [Index] | [ ? ] |
and tries to figure out the cluster status.
| [ < ] | [ > ] | [ << ] | [ Up ] | [ >> ] | |
| [Top] | [Contents] | [Index] | [ ? ] |
| [ < ] | [ > ] | [ << ] | [ Up ] | [ >> ] | |
| [Top] | [Contents] | [Index] | [ ? ] |
| [ < ] | [ > ] | [ << ] | [ Up ] | [ >> ] | |
| [Top] | [Contents] | [Index] | [ ? ] |
| [ < ] | [ > ] | [ << ] | [ Up ] | [ >> ] | |
| [Top] | [Contents] | [Index] | [ ? ] |
If a host goes down and the agent on it can't be reached, the monitor executes a "kill host"-binary if present. You have to provide a custom binary for this which takes the hostname as first argument and the state of check ping (1 - ok; 0 - not ok) as second argument. This binary could for example:
The default location for this binary is ‘bin_path/monitor/kill_host’. This may be changed via the variable kill_host_bin in the monitor section of the configuration.
| [ < ] | [ > ] | [ << ] | [ Up ] | [ >> ] | |
| [Top] | [Contents] | [Index] | [ ? ] |
mmm_control - controlling the monitor The monitor daemon may be controlled with the help of mmm_control. If you have multiple clusters, you should always specify the name of the cluster you want to work with (i.e. to check C1 status, use "mmm_control @C1 show"). Otherwise - if you have only one MMM cluster, it can be used without cluster name.
| [ < ] | [ > ] | [ << ] | [ Up ] | [ >> ] | |
| [Top] | [Contents] | [Index] | [ ? ] |
help Show help message.
| [ < ] | [ > ] | [ << ] | [ Up ] | [ >> ] | |
| [Top] | [Contents] | [Index] | [ ? ] |
ping Ping the monitor deamon to check if it's still alive.
# mmm_control ping OK: Pinged successfully! |
When the monitor is down:
# mmm_control ping ERROR: Can't connect to monitor daemon! |
| [ < ] | [ > ] | [ << ] | [ Up ] | [ >> ] | |
| [Top] | [Contents] | [Index] | [ ? ] |
show Show the current cluster status. See States for an explanation of the different node states.
# mmm_control show db1(192.168.0.31) master/ONLINE. Roles: writer(192.168.0.50), reader(192.168.0.51) db2(192.168.0.32) master/AWAITING_RECOVERY. Roles: db3(192.168.0.33) slave/ONLINE. Roles: reader(192.168.0.52), reader(192.168.0.53) |
| [ < ] | [ > ] | [ << ] | [ Up ] | [ >> ] | |
| [Top] | [Contents] | [Index] | [ ? ] |
checks [host|all [check|all]] Show information about the specified/all check(s) for the specified/all host(s).
# mmm_control checks mmm-master1 ping [last change: 2010/02/11 12:43:16] OK mmm-master1 mysql [last change: 2010/02/11 12:43:16] OK mmm-master1 rep_threads [last change: 2010/02/11 12:43:16] OK mmm-master1 rep_backlog [last change: 2010/02/11 12:43:16] OK: Backlog is null mmm-master2 ping [last change: 2010/02/11 12:43:16] OK mmm-master2 mysql [last change: 2010/02/11 12:43:16] OK mmm-master2 rep_threads [last change: 2010/02/11 12:43:16] OK mmm-master2 rep_backlog [last change: 2010/02/11 12:43:16] OK: Backlog is null # mmm_control checks mmm-master1 mmm-master1 ping [last change: 2010/02/11 12:43:16] OK mmm-master1 mysql [last change: 2010/02/11 12:43:16] OK mmm-master1 rep_threads [last change: 2010/02/11 12:43:16] OK mmm-master1 rep_backlog [last change: 2010/02/11 12:43:16] OK: Backlog is null # mmm_control checks mmm-master1 rep_backlog mmm-master1 rep_backlog [last change: 2010/02/11 12:43:16] OK: Backlog is null # mmm_control checks all rep_backlog mmm-master1 rep_backlog [last change: 2010/02/11 12:43:16] OK: Backlog is null mmm-master2 rep_backlog [last change: 2010/02/11 12:43:16] OK: Backlog is null |
6.5 set_online host | ||
6.6 set_offline host |
| [ < ] | [ > ] | [ << ] | [ Up ] | [ >> ] | |
| [Top] | [Contents] | [Index] | [ ? ] |
set_online host set_online is used to recover a node from a failure when it's state is
AWAITING_RECOVERY or ADMIN_OFFLINE. In the following example,
the host db2 was rebooted. Here's the cluster status:
# mmm_control show db1(192.168.0.31) master/ONLINE. Roles: writer(192.168.0.50), reader(192.168.0.51) db2(192.168.0.32) master/AWAITING_RECOVERY. Roles: db3(192.168.0.33) slave/ONLINE. Roles: reader(192.168.0.52), reader(192.168.0.53) |
All roles have been moved to hosts db1 and db3 as db2 has failed. Now that it's recovered, we should set it online:
# mmm_control set_online db2 OK: State of 'db2' changed to ONLINE. Now you can wait some time and check its new roles! # mmm_control show db1(192.168.0.31) master/ONLINE. Roles: writer(192.168.0.50), reader(192.168.0.51) db2(192.168.0.32) master/ONLINE. Roles: reader(192.168.0.52) db3(192.168.0.33) slave/ONLINE. Roles: reader(192.168.0.53) |
| [ < ] | [ > ] | [ << ] | [ Up ] | [ >> ] | |
| [Top] | [Contents] | [Index] | [ ? ] |
set_offline host set_offline is used to bring a node down manually for maintenance. This will remove all roles and stop replication.
# mmm_control show db1(192.168.0.31) master/ONLINE. Roles: writer(192.168.0.50), reader(192.168.0.51) db2(192.168.0.32) master/ONLINE. Roles: reader(192.168.0.52) db3(192.168.0.33) slave/ONLINE. Roles: reader(192.168.0.53) # mmm_control set_offline db1 OK: State of 'db1' changed to ADMIN_OFFLINE. Now you can wait some time and check all roles! mon:~# mmm_control show db1(192.168.0.31) master/ADMIN_OFFLINE. Roles: db2(192.168.0.32) master/ONLINE. Roles: writer(192.168.0.50), reader(192.168.0.52) db3(192.168.0.33) slave/ONLINE. Roles: reader(192.168.0.51), reader(192.168.0.53) |
set_online is used to bring the node back online again. See set_online host.
| [ < ] | [ > ] | [ << ] | [ Up ] | [ >> ] | |
| [Top] | [Contents] | [Index] | [ ? ] |
mode Print current mode. In the following example, the monitor is running in ACTIVE mode:
# mmm_control mode ACTIVE |
Here the monitor is in PASSIVE mode:
# mmm_control mode PASSIVE |
See Modes.
| [ < ] | [ > ] | [ << ] | [ Up ] | [ >> ] | |
| [Top] | [Contents] | [Index] | [ ? ] |
set_active Switch the monitor into ACTIVE mode:
# mmm_control set_active OK: Switched into active mode. |
See Modes.
| [ < ] | [ > ] | [ << ] | [ Up ] | [ >> ] | |
| [Top] | [Contents] | [Index] | [ ? ] |
set_manual Switch the monitor into MANUAL mode:
# mmm_control set_manual OK: Switched into manual mode. |
See Modes.
| [ < ] | [ > ] | [ << ] | [ Up ] | [ >> ] | |
| [Top] | [Contents] | [Index] | [ ? ] |
set_passive Switch the monitor into PASSIVE mode:
# mmm_control set_passive OK: Switched into passive mode. |
See Modes.
| [ < ] | [ > ] | [ << ] | [ Up ] | [ >> ] | |
| [Top] | [Contents] | [Index] | [ ? ] |
move_role role host Used to move an exclusive role between the cluster nodes. This command is not available in PASSIVE mode. Lets assume the following situation:
# mmm_control show db1(192.168.0.31) master/ONLINE. Roles: reader(192.168.0.51) db2(192.168.0.32) master/ONLINE. Roles: writer(192.168.0.50), reader(192.168.0.52) db3(192.168.0.33) slave/ONLINE. Roles: reader(192.168.0.53) |
We use move_role to move the role writer to host db1:
# mmm_control move_role writer db1 OK: Role 'writer' has been moved from 'db2' to 'db1'. Now you can wait some time and check new roles info! # mmm_control show db1(192.168.0.31) master/ONLINE. Roles: writer(192.168.0.50), reader(192.168.0.51) db2(192.168.0.32) master/ONLINE. Roles: reader(192.168.0.52) db3(192.168.0.33) slave/ONLINE. Roles: reader(192.168.0.53) |
| [ < ] | [ > ] | [ << ] | [ Up ] | [ >> ] | |
| [Top] | [Contents] | [Index] | [ ? ] |
move_role --force role host Can be used to move the active_master_role to a host with state REPLICATION_FAIL or REPLICATION_DELAY. Use this with caution! This command is not available in PASSIVE mode.
| [ < ] | [ > ] | [ << ] | [ Up ] | [ >> ] | |
| [Top] | [Contents] | [Index] | [ ? ] |
set_ip ip host set_ip can be used to manipulate the roles in PASSIVE mode. The changes won't be applied until the monitor is switched into ACTIVE or manual mode via set_active or set_manual.
| [ < ] | [ > ] | [ << ] | [ Up ] | [ >> ] | |
| [Top] | [Contents] | [Index] | [ ? ] |
| 7.1 Config files | ||
| 7.2 Configuration syntax | ||
| 7.3 Configuration variables |
| [ < ] | [ > ] | [ << ] | [ Up ] | [ >> ] | |
| [Top] | [Contents] | [Index] | [ ? ] |
Config files may resist in ‘/etc’, ‘/etc/mmm’ or ‘/etc/mysql-mmm’. ‘/etc/mysql-mmm’ should be preferred.
Program | Filename |
|---|---|
mmm_agentd | ‘mmm_agent.conf’ |
mmm_mond | ‘mmm_mon.conf’ or ‘mmm_mon_CLUSTER.conf’ |
mmm_control | ‘mmm_mon.conf’ or ‘mmm_mon_CLUSTER.conf’ |
mmm_backup | ‘mmm_tools.conf’ |
mmm_clone | ‘mmm_tools.conf’ |
mmm_restore | ‘mmm_tools.conf’ |
| [ < ] | [ > ] | [ << ] | [ Up ] | [ >> ] | |
| [Top] | [Contents] | [Index] | [ ? ] |
| [ < ] | [ > ] | [ << ] | [ Up ] | [ >> ] | |
| [Top] | [Contents] | [Index] | [ ? ] |
Lines which begin with the hash character # are considered comments,
and are ignored. Comments may not be included on a line after a configuration
directive. White space occuring before comments are ignored.
# This is a comment debug 1 # this is no comment |
| [ < ] | [ > ] | [ << ] | [ Up ] | [ >> ] | |
| [Top] | [Contents] | [Index] | [ ? ] |
asdsadasd
debug 0 |
| [ < ] | [ > ] | [ << ] | [ Up ] | [ >> ] | |
| [Top] | [Contents] | [Index] | [ ? ] |
For some variables you may specify multiple values seperated by a comma:
ips 192.168.0.51, 192.168.0.52, 192.168.0.53 |
| [ < ] | [ > ] | [ << ] | [ Up ] | [ >> ] | |
| [Top] | [Contents] | [Index] | [ ? ] |
The configuration is divided into two kinds of sections: unique and named.
| [ < ] | [ > ] | [ << ] | [ Up ] | [ >> ] | |
| [Top] | [Contents] | [Index] | [ ? ] |
Unique sections ... TODO
<monitor>
    ip     127.0.0.1
</monitor>
|
It is also possible to define empty unique sections:
<socket/> |
| [ < ] | [ > ] | [ << ] | [ Up ] | [ >> ] | |
| [Top] | [Contents] | [Index] | [ ? ] |
Named sections ... TODO
<host db1>
    ip     192.168.0.31
</host>
|
You may also define empty named sections:
<check mysql/> |
| [ < ] | [ > ] | [ << ] | [ Up ] | [ >> ] | |
| [Top] | [Contents] | [Index] | [ ? ] |
Values assigned in sections named default will be used as default values for all other sections of this type.
# Default mode of all hosts is 'slave'
<host default>
    mode	slave
</host>
|
| [ < ] | [ > ] | [ << ] | [ Up ] | [ >> ] | |
| [Top] | [Contents] | [Index] | [ ? ] |
It is possible to split up the configuration into several files and include them via include.
include common.conf |
| [ < ] | [ > ] | [ << ] | [ Up ] | [ >> ] | |
| [Top] | [Contents] | [Index] | [ ? ] |
| 7.3.1 Global variables | ||
7.3.2 monitor section | ||
7.3.3 host sections | ||
7.3.4 role sections | ||
7.3.5 check sections | ||
7.3.6 socket section | ||
7.3.7 copy_method sections |
| [ < ] | [ > ] | [ << ] | [ Up ] | [ >> ] | |
| [Top] | [Contents] | [Index] | [ ? ] |
Description: | name of this host |
Default value: | - |
Used by: | agent, tools |
Description: | Enable debug mode |
Allowed values: | true/yes/1/on false/no/0/off |
Default value: | 0 |
Used by: | agent, monitor |
Description: | name of the role for which identifies the active master |
Default value: | - |
Used by: | agent, monitor |
Description: | Maximum number of retries when killing threads to prevent further writes during the removal of the |
Default value: | 10 |
Used by: | agent |
Description: | name of the default copy method |
Default value: | - |
Used by: | tools |
Description: | path(s) containing mysql data/logs (relative to mount point of logical volume) |
Default value: | - |
Used by: | tools |
| [ < ] | [ > ] | [ << ] | [ Up ] | [ >> ] | |
| [Top] | [Contents] | [Index] | [ ? ] |
monitor section The monitor section is required by mmm_mond and mmm_control.
Description: | IP on which mmm_mond listens |
Default value: | - |
Used by: | control, monitor |
Description: | Port on which mmm_mond listens |
Default value: | 9988 |
Used by: | control, monitor |
Description: | Location of pid-file |
Default value: | - |
Used by: | monitor |
Description: | Path to directory containing MMM binaries |
Default value: | - |
Used by: | monitor |
Description: | Location of of status file |
Default value: | - |
Used by: | monitor |
Description: | Break between network checks |
Default value: | 1 |
Used by: | monitor |
Description: | IPs used for network checks |
Default value: | - |
Used by: | monitor |
Description: | Duration in seconds for flap detection. See |
Default value: | 3600 |
Used by: | monitor |
Description: | Maximum number of downtimes within |
Default value: | 3 |
Used by: | monitor |
Description: | How many seconds to wait before switching node status from |
Default value: | 0 |
Used by: | monitor |
Description: | Binary used to kill hosts if roles couldn't be removed because the agent was not reachable. You have to provide a custom binary for this which takes the hostname as first argument and the state of check ping (1 - ok; 0 - not ok) as second argument. |
Default value: | bin_path/monitor/kill_host |
Used by: | monitor |
Description: | Startup carefully i.e. switch into passive mode when writer role is configured on multiple hosts. |
Allowed values: | true/yes/1/on false/no/0/off |
Default value: | 0 |
Used by: | monitor |
Description: | Default mode of monitor. |
Allowed values: | active manual wait passive |
Default value: | active |
Used by: | monitor |
Description: | How many seconds to wait for other master to become |
Default value: | 120 |
Used by: | monitor |
| [ < ] | [ > ] | [ << ] | [ Up ] | [ >> ] | |
| [Top] | [Contents] | [Index] | [ ? ] |
host sections Description: | IP of host |
Default value: | - |
Used by: | agent, monitor, tools |
Description: | Mode of host. Either |
Default value: | - |
Used by: | agent, monitor |
Description: | Name of peer host (if mode is master) |
Default value: | - |
Used by: | agent, monitor |
Description: | Location of pid-file |
Default value: | - |
Used by: | agent |
Description: | Path to directory containing MMM binaries |
Default value: | - |
Used by: | agent |
Description: | Port on which mmm_agentd listens |
Default value: | 9989 |
Used by: | agent, monitor |
Description: | network interface on which the IPs of the roles should be configured |
Default value: | - |
Used by: | agent |
Description: | Port on which mysqld is listening |
Default value: | 3306 |
Used by: | agent, monitor, tools |
Description: | location of mysql pid-file |
Default value: | /var/run/mysqld/mysqld.pid |
Used by: | tools |
Description: | location of mysql rc-script |
Default value: | /etc/init.d/mysql |
Used by: | tools |
Description: | location of my.cnf |
Default value: | /etc/my.cnf |
Used by: | tools |
Description: | mysql user for MMM Agent |
Default value: | - |
Used by: | agent |
Description: | mysql password for MMM Agent |
Default value: | - |
Used by: | agent |
Description: | mysql user for MMM Monitor |
Default value: | - |
Used by: | monitor |
Description: | mysql password for MMM Monitor |
Default value: | - |
Used by: | monitor |
Description: | mysql user used for replication |
Default value: | - |
Used by: | agent, tools |
Description: | mysql password used for replication |
Default value: | - |
Used by: | agent, tools |
Description: | SSH user for MMM Tools |
Default value: | - |
Used by: | tools |
Description: | SSH port for MMM Tools |
Default value: | 22 |
Used by: | tools |
Description: | additional SSH parameters for MMM Tools |
Default value: | - |
Used by: | tools |
Description: | mysql user for MMM Tools |
Default value: | - |
Used by: | tools |
Description: | mysql password for MMM Tools |
Default value: | - |
Used by: | tools |
Description: | Target directory for backups |
Default value: | - |
Used by: | tools |
Description: | Directory where backups should be restored to |
Default value: | - |
Used by: | tools |
Description: | Path to lvcreate binary |
Default value: | lvcreate |
Used by: | tools |
Description: | Path to lvremove binary |
Default value: | lvremove |
Used by: | tools |
Description: | Size of LVM snapshot |
Default value: | - |
Used by: | tools |
Description: | Logical volume where mysql data and logs reside |
Default value: | - |
Used by: | tools |
Description: | Volume group of logical volume with mysql data and logs |
Default value: | - |
Used by: | tools |
Description: | Mount point for LVM snapshot |
Default value: | - |
Used by: | tools |
Description: | Mount options used when mounting LVM snapshot |
Default value: | - |
Used by: | tools |
| [ < ] | [ > ] | [ << ] | [ Up ] | [ >> ] | |
| [Top] | [Contents] | [Index] | [ ? ] |
role sections This section defines what roles are in the cluster and which IPs will be used for each role. Since roles are moved among servers each server needs an IP (for the monitor to talk to it) and each role needs an IP.
Description: | Mode of role. Either |
Default value: | - |
Used by: | monitor |
Description: | Hosts which may take over the role |
Default value: | - |
Used by: | monitor |
Description: | One or multiple IPs associated with the role |
Default value: | - |
Used by: | agent, monitor |
Description: | The preferred host for this role. Only allowed for |
Default value: | - |
Used by: | monitor |
| [ < ] | [ > ] | [ << ] | [ Up ] | [ >> ] | |
| [Top] | [Contents] | [Index] | [ ? ] |
check sections Description: | Perform check every 5 seconds |
Default value: | 5 |
Used by: | monitor |
Description: | Check is considered as failed if it doesn't succeed for at least trap_period seconds. |
Default value: | 10 |
Used by: | monitor |
Description: | Check times out after timeout seconds |
Default value: | 2 |
Used by: | monitor |
Description: | Restart checker process after restart_after checks |
Default value: | 10000 |
Used by: | monitor |
Description: | Maximum backlog for check |
Default value: | 60 |
Used by: | monitor |
| [ < ] | [ > ] | [ << ] | [ Up ] | [ >> ] | |
| [Top] | [Contents] | [Index] | [ ? ] |
socket section Description: | Socket type to use. Either |
Default value: | - |
Used by: | agent, control, monitor |
Description: | location of SSL certificate (if type is ssl) |
Default value: | - |
Used by: | agent, control, monitor |
Description: | location of RSA private key (if type is ssl) |
Default value: | - |
Used by: | agent, control, monitor |
Description: | location of file containing certificate(s) of the reputable certificate authorities (if type is ssl) |
Default value: | - |
Used by: | agent, monitor |
| [ < ] | [ > ] | [ << ] | [ Up ] | [ >> ] | |
| [Top] | [Contents] | [Index] | [ ? ] |
copy_method sections Description: | Command used for creation of backup |
Default value: | - |
Used by: | tools |
Description: | Command used for restoring backup |
Default value: | - |
Used by: | tools |
Description: | Command used for showing available increments |
Default value: | - |
Used by: | tools |
Description: | Indicates whether the copy method supports incremental backups |
Default value: | 0 |
Used by: | tools |
Description: | Indicates whether the copy method is able to copy all dirs in one single run |
Default value: | 0 |
Used by: | tools |
Description: | Indicates whether the copy method creates a 1:1 copy of the data |
Default value: | 0 |
Used by: | tools |
| [ < ] | [ > ] | [ << ] | [ Up ] | [ >> ] | |
| [Top] | [Contents] | [Index] | [ ? ] |
| 8.1 Logging config files | ||
| 8.2 Log4perl sample configuration |
| [ < ] | [ > ] | [ << ] | [ Up ] | [ >> ] | |
| [Top] | [Contents] | [Index] | [ ? ] |
MMM uses Log4perl for logging, so the logging abilities are very flexible. If the default logging configuration doesn't fit your needs you can create a config file which may resist in ‘/etc’, ‘/etc/mmm’ or ‘/etc/mysql-mmm’. ‘/etc/mysql-mmm’ should be preferred.
The name of the file depends on the program you want to create it for:
Program | Filename |
|---|---|
mmm_agentd | ‘mmm_agent_log.conf’ |
mmm_mond | ‘mmm_mon_log.conf’ or ‘mmm_mon_log_CLUSTER.conf’ |
mmm_control | ‘mmm_mon_log.conf’ or ‘mmm_mon_log_CLUSTER.conf’ |
mmm_backup | - |
mmm_clone | - |
mmm_restore | - |
| [ < ] | [ > ] | [ << ] | [ Up ] | [ >> ] | |
| [Top] | [Contents] | [Index] | [ ? ] |
Here is the default logging configuration:
log4perl.logger = INFO, LogFile log4perl.appender.LogFile = Log::Log4perl::Appender::File log4perl.appender.LogFile.Threshold = INFO log4perl.appender.LogFile.filename = /var/log/mysql-mmm.htmlprogam.info log4perl.appender.LogFile.recreate = 1 log4perl.appender.LogFile.layout = PatternLayout log4perl.appender.LogFile.layout.ConversionPattern = %d %5p %m%n |
In addition to that, if debug mode is enabled:
log4perl.logger = DEBUG, ScreenLog, LogFile log4perl.appender.ScreenLog = Log::Log4perl::Appender::Screen log4perl.appender.ScreenLog.stderr = 0 log4perl.appender.ScreenLog.layout = PatternLayout log4perl.appender.ScreenLog.layout.ConversionPattern = %d %5p %m%n |
It is also possible to log into multiple files (separated by severity) or let MMM send you mails (this was the default logging configuration in versions below 2.1.1):
log4perl.logger = INFO, FileInfo, FileWarn, FileError, FileFatal, MailFatal log4perl.appender.FileInfo = Log::Log4perl::Appender::File log4perl.appender.FileInfo.Threshold = INFO log4perl.appender.FileInfo.filename = /var/log/mysql-mmm.htmlprogam.info log4perl.appender.FileInfo.recreate = 1 log4perl.appender.FileInfo.layout = PatternLayout log4perl.appender.FileInfo.layout.ConversionPattern = %d %5p %m%n log4perl.appender.FileWarn = Log::Log4perl::Appender::File log4perl.appender.FileWarn.Threshold = WARN log4perl.appender.FileWarn.filename = /var/log/mysql-mmm.htmlprogam.warn log4perl.appender.FileWarn.recreate = 1 log4perl.appender.FileWarn.layout = PatternLayout log4perl.appender.FileWarn.layout.ConversionPattern = %d %5p %m%n log4perl.appender.FileError = Log::Log4perl::Appender::File log4perl.appender.FileError.Threshold = ERROR log4perl.appender.FileError.filename = /var/log/mysql-mmm.htmlprogam.error log4perl.appender.FileError.recreate = 1 log4perl.appender.FileError.layout = PatternLayout log4perl.appender.FileError.layout.ConversionPattern = %d %5p %m%n log4perl.appender.FileFatal = Log::Log4perl::Appender::File log4perl.appender.FileFatal.Threshold = FATAL log4perl.appender.FileFatal.filename = /var/log/mysql-mmm.htmlprogam.fatal log4perl.appender.FileFatal.recreate = 1 log4perl.appender.FileFatal.layout = PatternLayout log4perl.appender.FileFatal.layout.ConversionPattern = %d %5p %m%n log4perl.appender.MailFatal = Log::Dispatch::Email::MailSend log4perl.appender.MailFatal.Threshold = FATAL log4perl.appender.MailFatal.to = root log4perl.appender.MailFatal.buffered = 0 log4perl.appender.MailFatal.subject = FATAL error in progam log4perl.appender.MailFatal.layout = PatternLayout log4perl.appender.MailFatal.layout.ConversionPattern = %d %m%n |
| [ < ] | [ > ] | [ << ] | [ Up ] | [ >> ] | |
| [Top] | [Contents] | [Index] | [ ? ] |
| Jump to: | A C F H K L M N O R S T U V |
|---|
| Jump to: | A C F H K L M N O R S T U V |
|---|
| [Top] | [Contents] | [Index] | [ ? ] |
| [Top] | [Contents] | [Index] | [ ? ] |
This document was generated on May, 7 2010 using texi2html 1.78.
The buttons in the navigation panels have the following meaning:
| Button | Name | Go to | From 1.2.3 go to |
|---|---|---|---|
| [ < ] | Back | Previous section in reading order | 1.2.2 |
| [ > ] | Forward | Next section in reading order | 1.2.4 |
| [ << ] | FastBack | Beginning of this chapter or previous chapter | 1 |
| [ Up ] | Up | Up section | 1.2 |
| [ >> ] | FastForward | Next chapter | 2 |
| [Top] | Top | Cover (top) of document | |
| [Contents] | Contents | Table of contents | |
| [Index] | Index | Index | |
| [ ? ] | About | About (help) |
where the Example assumes that the current position is at Subsubsection One-Two-Three of a document of the following structure:
This document was generated on May, 7 2010 using texi2html 1.78.